.
Tired of trying to get hot-reloading to work in Docker? I know I am. With all the hype around .NET Aspire, I figured it was time to see if I could get my favorite “hobby” stack working with .NET Aspire. Spoiler alert: it was easier than I thought!

Lately, I really enjoy combining a Next.js website with a .NET Web API. This setup lets me tap into the extensive React and Next.js ecosystem to quickly build great websites with all the power of .NET on the backend
Now, let's get both of them running in Aspire to make this stack even better!
Streamline Local Development with .NET Aspire
Next.js has been the modern web developments golden standard for years, and with the recent release of React 19, that momentum isn’t slowing down. But if you’ve ever tried running a Next.js frontend alongside a .NET API in local development, you already know the pain:
- Managing Dockerfiles and docker-compose just to get a basic setup working
- Fighting hot-reloading issues with .NET inside Docker
- Constantly tweaking volume mounts and dotnet watch run hoping for a smooth experience
Let’s be real—traditional containerized development sucks for quick iteration. Enter .NET Aspire, Microsoft’s local development orchestration tool. With Aspire, you get:
- Seamless orchestration - No need for deviating Dockerfiles for local development
- Built-in service discovery
- Support for hot-reloading - Changes in your API reflect instantly, no container restarts required
- Sane local development - Run everything together without the usual containerization headaches
Honestly, setting up Aspire is so easy, I now add it to all my new projects. Even if I don’t need it right away, I know it’ll save me time down the line.
Setting Up .NET Aspire for API and Frontend Development
Let’s get the boilerplate out of the way. We need a solution that includes a .NET Aspire Host and ServiceDefaults, a .NET API, and a Next.js website. You can run the following commands to set up a basic project.
1# Create the the required projects2md DotnetAspireNext | cd3dotnet new aspire4md DotnetAspireNext.Api | cd5dotnet new webapi6cd ..78# Wire everything together9dotnet sln add .\DotnetAspireNext.Api\10dotnet add .\DotnetAspireNext.Api\ reference .\DotnetAspireNext.ServiceDefaults\11dotnet add .\DotnetAspireNext.AppHost\ reference .\DotnetAspireNext.Api\1213#create Next.js project14npx create-next-app@latest
Running a .NET API with Aspire is pretty easy, for an API without any dependencies we can simply add this line to our DotnetAspireNext.:
1var api = builder.AddProject<DotnetAspireNext_Api>("api");
Adding Next.js to .NET Aspire
Aspire allows us to orchestrate Node.js apps using the Aspire. package. This package provides two ways to integrate Node projects: AddNodeApp and AddNpmApp. Even though Next.js is technically a Node app, we need to use AddNpmApp because Next.js apps run with npm run dev instead of node somefile..
If you prefer using Yarn or PNPM, you can use CommunityToolkit..
1dotnet add DotnetAspireNext.AppHost package Aspire.Hosting.NodeJS2# or when using Yarn or PNPM3dotnet add DotnetAspireNext.AppHost package CommunityToolkit.Aspire.Hosting.NodeJS.Extensions
Now we can configure Aspire to run our Next.js project like so:
1var api = builder.AddProject<DotnetAspireNext_Api>("api");23var frontend = builder4.AddNpmApp("frontend", "../frontend", "dev")5.WithNpmPackageInstallation()6.WaitFor(api)7.WithReference(api)8.WithHttpEndpoint(env: "PORT") // Make sure Next.js uses the port assigned by Aspire9.WithExternalHttpEndpoints();
Running the Aspire project will quickly show us that both our API and Next app are running and accessible:

Fetching Data from Your .NET API in Next.js
There are several ways to access our API from our Next.js project.
The simplest approach is to export a variable containing the API endpoint or create a fetch/axios wrapper with the endpoint hardcoded. However, you’d then need a way to update this value when deploying to a server.
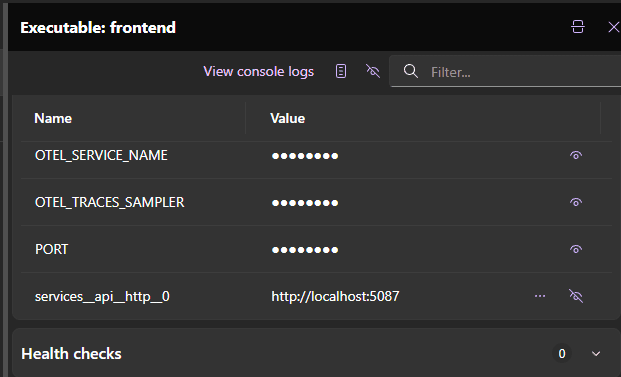
A better approach is to use environment variables. Fortunately, Aspire automatically adds an environment variable to our frontend project when we include .. If we check the Aspire Dashboard, we can see an environment variable called services_ containing the API endpoint.

Using Next.js as a proxy
While environment variables should work, you might run into CORS issues when calling the API from a client component. One way to solve this is by using Next.js as a proxy.
We can achieve this using Next.js rewrites:
1// next.config.js2const API_URL = process.env["services__api__http__0"];34/** @type {import('next').NextConfig} */5const nextConfig = {6async rewrites() {7return [8{9source: "/api/:path*",10destination: `${API_URL}/:path*`,11},12];13},14};1516module.exports = nextConfig;
The downside of this approach is that rewrites only work on the client side. Calling fetch('/ works fine in a client component but will fail in a server component.
The best way to handle this is to export a constant variable that uses a different URL depending on where the code is executed:
1// constant.js2export const APIEndpoint =3typeof window === "undefined"4? process.env["services__api__http__0"]5: "/api";
Accessing .NET Aspire Service Endpoints Dynamically
Aspire works some magic behind the scenes to ensure each service has a single predictable endpoint, regardless of how many replicas or services are running.
This 'magic' boils down to Aspire placing proxies before each service you register. It is the proxy that listens on the port defined in launchSettings. or .. Meanwhile, the actual app runs on a different endpoint managed by Aspire. This allows multiple instances of an application to run while keeping a single predictable endpoint.
While this setup is useful, it can cause issues if an application assumes its internal address matches its external address.
Endpoints are assigned after calling builder.. However, . has an overload that accepts a callback, which runs after Aspire assigns all endpoints. This allows us to use GetEndpoint() on a service resource to set environment variables dynamically. Normally, calling GetEndpoint() too early would throw an exception since the endpoint wouldn’t exist until the Aspire stack is built.
1var frontend = builder2.AddNpmApp("frontend", "../frontend", "dev")3// ... more configuration4;56frontend.WithEnvironment("SOME_ENV_VAR", ()=>frontend.GetEndpoint("http").Url);
Wrapping Up
.NET Aspire makes it surprisingly easy to orchestrate a local development environment. Instead of dealing with complex Docker setups or unreliable hot-reloading, you get a streamlined workflow where everything just works.
If you're already working with .NET, this setup is worth exploring. It makes local development a lot more enjoyable and efficient. Adding additional dependencies, like Redis or PostgreSQL, is just as easy as adding a new project.
Of course, no tool is perfect. .NET Aspire is still evolving, and depending on your project’s needs, you may run into edge cases. But if you’re looking for a cleaner, more efficient way to develop locally, this approach is certainly worth trying.
I’ll be diving deeper into .NET Aspire in future articles—covering more advanced scenarios, potential pitfalls, and how it fits into real-world workflows. So if you're experimenting with it yourself, keep an eye out for what’s next.
What to read next:
I really hope you enjoyed this article. If you did, you might want to check out some of these articles I've written on similar topics.
- Read Build AI-Powered Applications with Microsoft.Extensions.AI
 — 9 min read readBuild AI-Powered Applications with Microsoft.Extensions.AI
 - Read Improve Signalr and React Performance User Experience
 — 5 min read readImprove Signalr and React Performance User Experience
 - Read Sync React with SignalR Events
 — 8 min read readSync React with SignalR Events